Cypress Visual Regression: The Real Cost
Written byDominik Szahidewicz


Updated: September 3, 2026View as Markdown
TL;DR:
Cypress can't do visual regression natively — you need a free plugin (cypress-image-diff) or a paid service (Applitools, Percy) to close the loop. Plugins live in your repo but make you pin Docker, manage baselines, and tune thresholds yourself; services handle the hard parts but cost money and lock in your baselines.
Either way, the maintenance tax is ongoing and rarely mentioned in tutorials. BugBug builds visual regression in as a native step — lowest-maintenance for web-only Chromium teams, though cross-browser still belongs to Applitools or Percy.
You tweak one line of CSS. A padding value, a flex property, nothing scary. The build goes green — every Cypress test passes, because every button still exists and every click still fires. Then a screenshot lands in Slack three days later: the pricing page's CTA is white text on a white background. Your functional tests never had a chance. They check whether the button works, not whether anyone can see it.
That's the gap visual regression testing fills. And here's the thing most tutorials won't tell you up front: Cypress doesn't support visual regression testing natively. It can capture screenshots, but it has no built-in image comparison, baseline management, or review workflow, so you need plugins or a paid service to make it work. For teams already using or evaluating Cypress — developers, QA engineers, and even non-engineering teams that want easier visual checks — that trade-off matters fast, because visual coverage adds cost, setup, and ongoing maintenance before it adds confidence.
👉 How to Perform Visual Regression Testing? Check our comprehensive guide: Visual Regression Testing: Catch Bugs Tests Miss
This article is the honest version. It breaks down how visual regression works with Cypress, where Cypress's native capabilities stop, how plugin-based setups compare with commercial services, what tends to create maintenance and reliability problems, and how that stack compares with BugBug's built-in visual regression approach — including where the built-in option loses. If you're deciding how to add visual coverage to a Cypress suite, or whether Cypress should be the foundation at all, this is the map.
Here's the whole native story in one sentence: cy.screenshot() takes a picture and saves it to disk. That's it. There is no baseline concept, no pixel comparison, no pass/fail on visual difference, no diff image. Cypress gives you the camera and nothing else.
Visual regression, as a discipline, needs four things to work:
Cypress does step one, halfway. Steps two through four are on you — which means picking a plugin or a paid service, because those are the only two ways to close the loop. That fork in the road is the real decision, so let's walk both sides honestly.
👉 Also check our guide on Playwright Visual Regression Testing
Every Cypress visual regression setup is one of two shapes. You either install an open-source plugin and own the whole pipeline, or you wire in a commercial cloud service and rent the hard parts. Neither is free of trade-offs — they just move the cost to different places.
The community-maintained plugins are the default starting point: cypress-image-diff, cypress-visual-regression, and cypress-image-snapshot are the three most widely used, with cypress-image-diff showing the most active maintenance and community engagement. They all work roughly the same way — extend Cypress with a compareSnapshot command, capture snapshots, compare images against a base image stored in your repo, and diff them pixel by pixel.
The plugin itself costs nothing. What it costs is the wiring. Here's the full path from zero to one working visual check with cypress-image-diff:
npm install cypress-image-diff-js
// cypress.config.js — register the plugin's node events
const { defineConfig } = require('cypress');
const getCompareSnapshotsPlugin = require('cypress-image-diff-js/plugin');

module.exports = defineConfig({
  e2e: {
    setupNodeEvents(on, config) {
      getCompareSnapshotsPlugin(on, config);
      return config;
    },
  },
});
// cypress/support/e2e.js — make the command available
import 'cypress-image-diff-js/command';
// now you can call it in a test
it('pricing page looks right', () => {
  cy.visit('/pricing');
  cy.get('[data-cy="pricing-cta"]').should('be.visible'); // wait until ready
  cy.compareSnapshot('pricing-page');
});
Four files touched before a single comparison runs. And that's just to get the green checkmark — you still own baseline storage, threshold tuning, and the Docker-pinned environment that stops false failures. The install is free. The hours are not.
The verdict: genuinely free, fully under your control, and the tests live in your repo where your team can review them in a pull request. That's real, and for a developer team that values owning its stack, it matters.
The mechanism of pain: Pixel-by-pixel comparison is brutally literal. Even minor code changes can trigger visual changes while functional assertions still pass. It doesn't know that a one-pixel anti-aliasing shift between your Mac dev machine and your Linux CI runner is meaningless — it just sees different pixels and fails the test. So now you're pinning a Docker image to force a consistent rendering environment, because that's the only way to stop the false failures. You own baseline storage (and the Git bloat that comes with committing images). You own threshold tuning across every test. You own the review workflow, which for most of these plugins means squinting at diff images in a CI artifacts folder. The plugin is free. The maintenance is a part-time job.
Best Practices: use stable selectors, wait until the UI is fully loaded before taking screenshots, and control time-based UI with cy.clock() plus test data with cy.fixture().
Best for: developer teams already deep in Cypress, with the CI sophistication to manage Docker-pinned environments and the discipline to keep baselines clean.
Avoid if: nobody on the team wants to own the infrastructure, or your "QA person" doesn't write code.
The other path plugs Cypress into a dedicated visual testing cloud. Percy (owned by BrowserStack), Applitools Eyes, and Chromatic are the three names you'll hit most, each acting as a visual testing tool alongside Cypress. Chromatic integrates with Cypress to enable automated visual testing, and its workflow centers on archived chromatic captures from each test run for comparison and review. They take over baseline management, cross-browser rendering, and the review workflow — the exact three things that eat your time with plugins.
Percy runs a free tier of 5,000 screenshots per month with unlimited users and 30-day build history, then meters by screenshot — note that one page across two browsers at three widths counts as six screenshots, not one, so the math climbs fast. Paid plans start around $199/month. Its Visual AI ("Intelli-ignore") filters dynamic noise like carousels and timestamps, and you get cross-browser rendering out of the box.
Applitools Eyes is the heavyweight. Its Visual AI is perceptual — it evaluates screenshots the way a human eye would rather than counting raw pixels, which meaningfully cuts the false-positive fatigue that plagues pixel-based tools. It traces defects to the DOM element and renders cross-browser through its Ultrafast Grid. It's also priced for the enterprise: no meaningful permanent free tier, with published starter figures around $899–$969/month and real deployments running well beyond that.
The verdict: these solve the genuinely hard problems. Applitools' Visual AI in particular is better at "ignore the noise, catch the real break" than any pixel-diff plugin will ever be — if cross-browser coverage and low false positives are the job, this is the honest answer.
The cost: it's real money, metered in a unit (screenshots, checkpoints, test units) that's easy to underestimate until the invoice arrives. And your baselines and test history now live inside their platform — that's convenience today and lock-in tomorrow.
Best for: teams that need cross-browser visual coverage, have design-critical UIs, and have the budget.
Avoid if: you're a small team on Chromium who'll never use the cross-browser grid you're paying for.
Every how to set up visual regression in Cypress guide ends at the green checkmark. The real story starts after that — when the suite has been running for two months and you're deciding whether visual testing is helping or just generating noise. Here's what actually eats the hours, whichever plugin you chose (also check our guide on test automation maintenance):
Every intentional redesign invalidates baselines. Someone has to regenerate them, review that the new references are actually correct (not just different), and commit them. Do this carelessly and you get "bad baselines" — a broken UI accepted as the reference, so the test now guards the wrong thing forever. With repo-committed baselines, you also carry the Git weight of binary images changing on every design tweak.
This is the one that surprises people. Browsers render text and layout differently across operating systems and GPUs. A snapshot captured on a developer's Mac and compared against one from a Linux CI server will differ in sub-pixel anti-aliasing — and a pixel-diff plugin will fail it, loudly, for no real reason. The fix is to generate and compare in one locked environment, usually a specific Docker image. Which means you're now maintaining a Docker image as a dependency of your test suite. That's infrastructure work most teams didn't budget for.
Set the tolerance too low and you drown in false failures from rendering noise; the team starts ignoring the suite, which is the same as not having it. Set it too high and you sail right past real regressions. Most teams start around 0.5–1% and adjust per component, and for genuinely dynamic regions — dynamic content like ads, timestamps, personalized content, or other third-party widgets — you mask the area rather than crank the global threshold, because controlling dynamic content reduces false positives. This is ongoing judgment, not a one-time config.
Visual testing works best in a controlled environment. If you snapshot before the page settles — mid-animation, spinner still visible, data still loading — you capture a state that's different every run. So every visual assertion needs a functional guard in front of it (cy.get('.status').should('have.text', 'Complete')) to confirm the page is actually ready. Miss one, and you've got a flaky test that looks like a real failure.
None of this is a knock on Cypress specifically — it's the nature of visual testing. But with the plugin route, all of it is your team's standing responsibility, on top of writing the cypress visual test itself. That's the number to weigh, and it's the number the tutorials leave out. A cypress visual test is more sustainable when teams limit snapshots to critical user flows and key ui elements instead of trying to capture everything.
Here's the honest scan, side by side. Note where each option loses — because they all lose somewhere.
| Cypress + OSS plugin | Cypress + Applitools/Percy | BugBug | |
|---|---|---|---|
| Setup | Install, config files, support file edits | SDK + account + CI wiring for cypress integration | Add a visual regression step — no install |
| Visual diffing | Not native — plugin adds it | Not native — service adds it | Built-in native step |
| Comparison tech | Pixel-by-pixel | Visual AI (perceptual) | Pixel-based + adjustable sensitivity |
| Baseline management | Manual, committed to your repo | Auto, in the vendor cloud | Auto, per environment |
| Cross-browser | Chromium (Firefox/WebKit via config effort) | Yes — multiple browsers with checks across viewport widths and screen sizes | ❌ Chromium only |
| Review workflow | Diff images in CI artifacts | Cloud review dashboard | Built-in Review & fix flow with key features |
| Environment consistency | Your job (Docker pinning) | Handled in cloud | Auto — separate reference per environment |
| Skill level | Code (JS/TS) | Code (JS/TS) | Low-code / no-code |
| Pricing | Free (plugin) | Free tier → ~$199–$969+/mo | Core Plan $99/mo |
The table makes the trade-offs plain. Cypress + Applitools wins cross-browser and false-positive handling. The OSS plugin wins on cost and repo ownership. BugBug wins on setup and maintenance overhead — and loses cross-browser outright. No row where one tool sweeps everything, because that's not the real world.
👉 Compare: Cypress Recorder vs BugBug
Everything above is about assembling visual regression onto Cypress. BugBug's difference is that there's nothing to assemble — visual regression is a native step that lets teams perform visual checks in testing web applications without extra assembly, not a plugin you install and wire up.
Here's how it works.
You add a visual regression step during a test. On the first run, BugBug can generate baseline images from the first screenshot and save the result as the baseline automatically, with each baseline starting from a reference base image linked to that specific environment — defined by browser, OS, screen size, profile, and run mode (cloud or local).
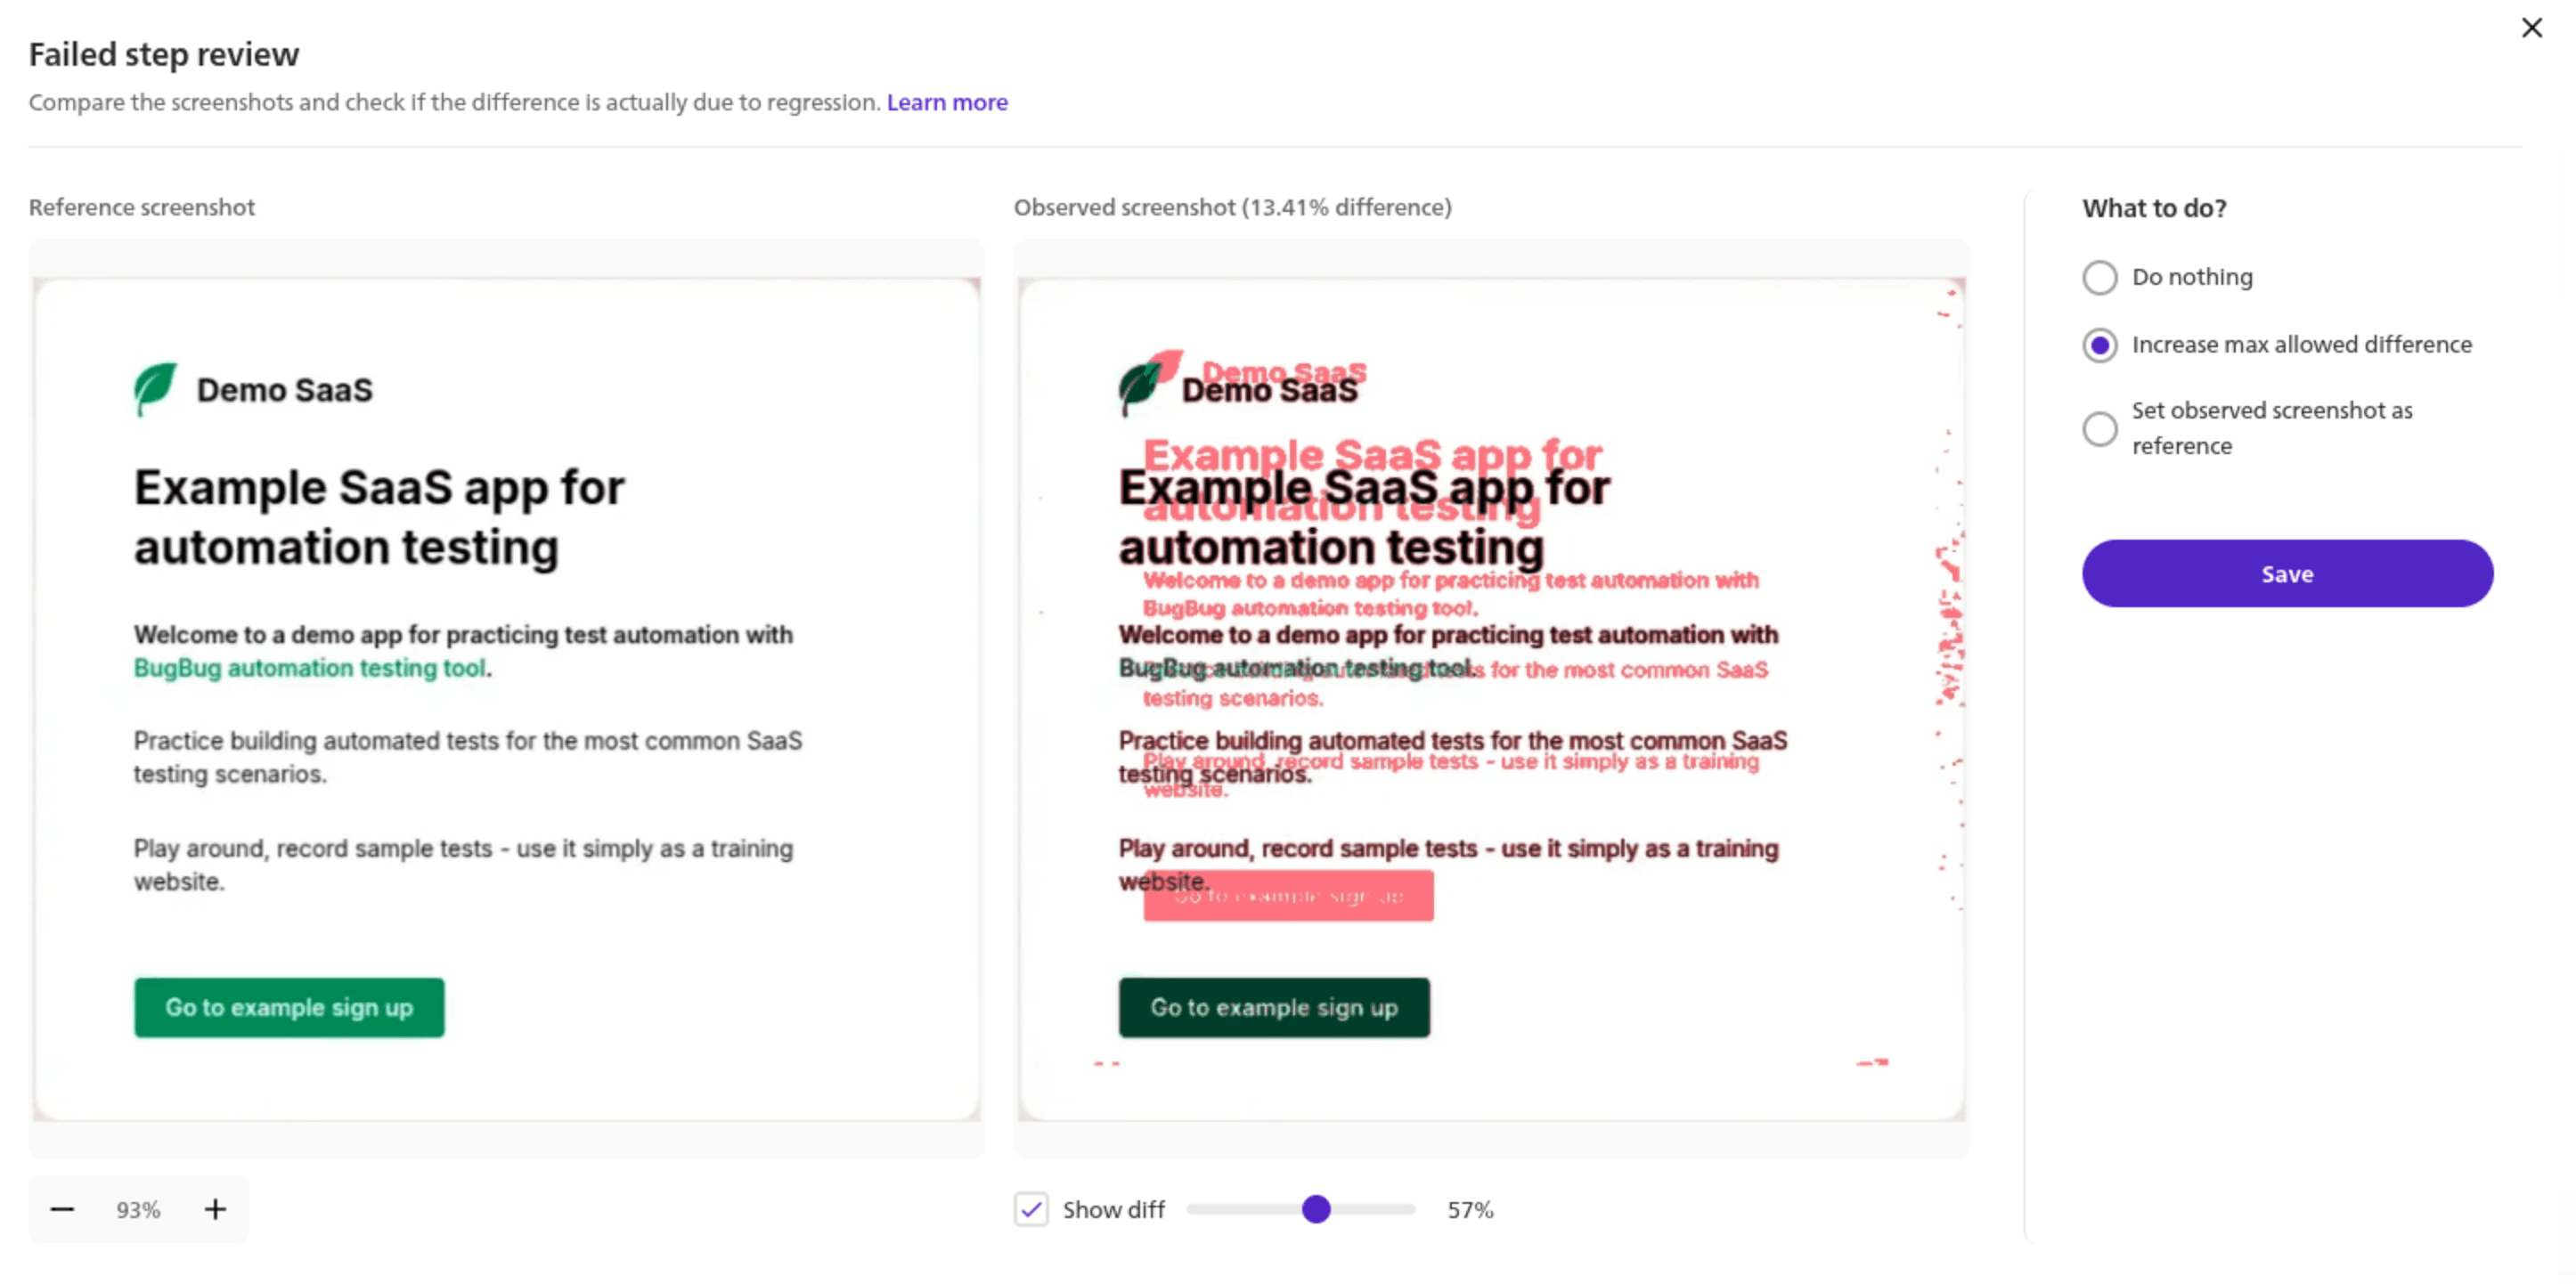
On later runs, it uses image comparison for comparing screenshots against the matching reference, measures the difference as a percentage, and surfaces visual diffs so the step passes or fails against a max difference threshold you control.
When something fails, the Review & fix flow shows you the reference, the observed screenshot, and a diff overlay side by side, and lets you do one of three things: keep the reference (real bug), raise the tolerance (acceptable minor variation), or set the new screenshot as the baseline (intentional redesign). Keyboard shortcuts, bulk-apply for design refreshes that hit many steps at once — it's a purpose-built review surface, not a folder of PNGs.
The environment-specific baselines matter more than they sound. BugBug sidesteps it by storing a separate reference per environment and comparing like with like — desktop against desktop, same browser against same browser. You're not maintaining a rendering environment to keep the tool honest; the tool accounts for it.
And because this lives inside a full E2E tool, the same suite that checks how your app looks also checks how it works — login, checkout, onboarding, the flows that break in ways a screenshot won't catch — without a second vendor, a second bill, or a second thing to maintain, while also helping validate what the user sees after code changes, not just functionality.
Now the honest limits, because they're real and they matter here.
BugBug is Chromium only. If you need to catch visual regressions in Firefox or Safari, BugBug can't do it, and Cypress-plus-Applitools or Percy is the correct call — full stop. BugBug's comparison is pixel-based with adjustable sensitivity and anti-aliasing handling, not perceptual Visual AI.
It's strong for catching unintended visual changes on stable pages, but less forgiving than AI on highly dynamic pages. And the maintenance work that's inherent to visual testing — keeping screens in a stable state, choosing thresholds with judgment, updating baselines deliberately — still exists.
BugBug removes the assembly and infrastructure tax. It doesn't repeal the laws of visual testing. Its own best-practices guidance says the same thing: prefer element-level checks, keep the screen state stable, update references intentionally.
Best for: web-only SaaS teams on Chromium who want functional and visual coverage in one low-maintenance tool, without owning a plugin stack or a Docker image. That's the profile where it's the fastest path from zero to a working, maintainable visual check.
No universal winner here — just a match between your situation and the trade-off you can live with.
Choose Cypress + an open-source plugin if: you're already invested in Cypress and focused on testing with cypress for visual checks, you have developer time to own baselines and pin a Docker environment, and zero licensing cost is worth the maintenance hours. You want the tests in your repo and you have the discipline to keep them clean.
Choose Cypress + Applitools or Percy if: you need real cross-browser visual coverage, your UI is design-critical, and false-positive fatigue is the enemy — Applitools' Visual AI is the strongest answer to that specific problem, and you have the budget to match. Percy is the lighter, more affordable entry if you want AI noise-filtering without the enterprise weight, and both help teams perform visual coverage across multiple browsers after you create the setup once in the command line and CI.
Choose BugBug if: you're web-only on Chromium, you want visual and functional testing in one place, and you'd rather create a visual step than install, configure, and maintain a plugin pipeline especially if the person who'll own testing isn't a full-time engineer who wants to babysit a Docker image.
If that last profile is you, BugBug's 14-day free trial is the fastest way to find out if it fits — no credit card, first test running in minutes, and you'll know within an afternoon whether the built-in approach saves you the maintenance tax the plugin route charges, including when you need to run checks from the command line. Ready to catch the bugs your green checkmarks are hiding?
Automate visual regression testing
Test easier than ever with BugBug test recorder. Faster than coding. Free forever.
Get started
Happy (automated) testing!
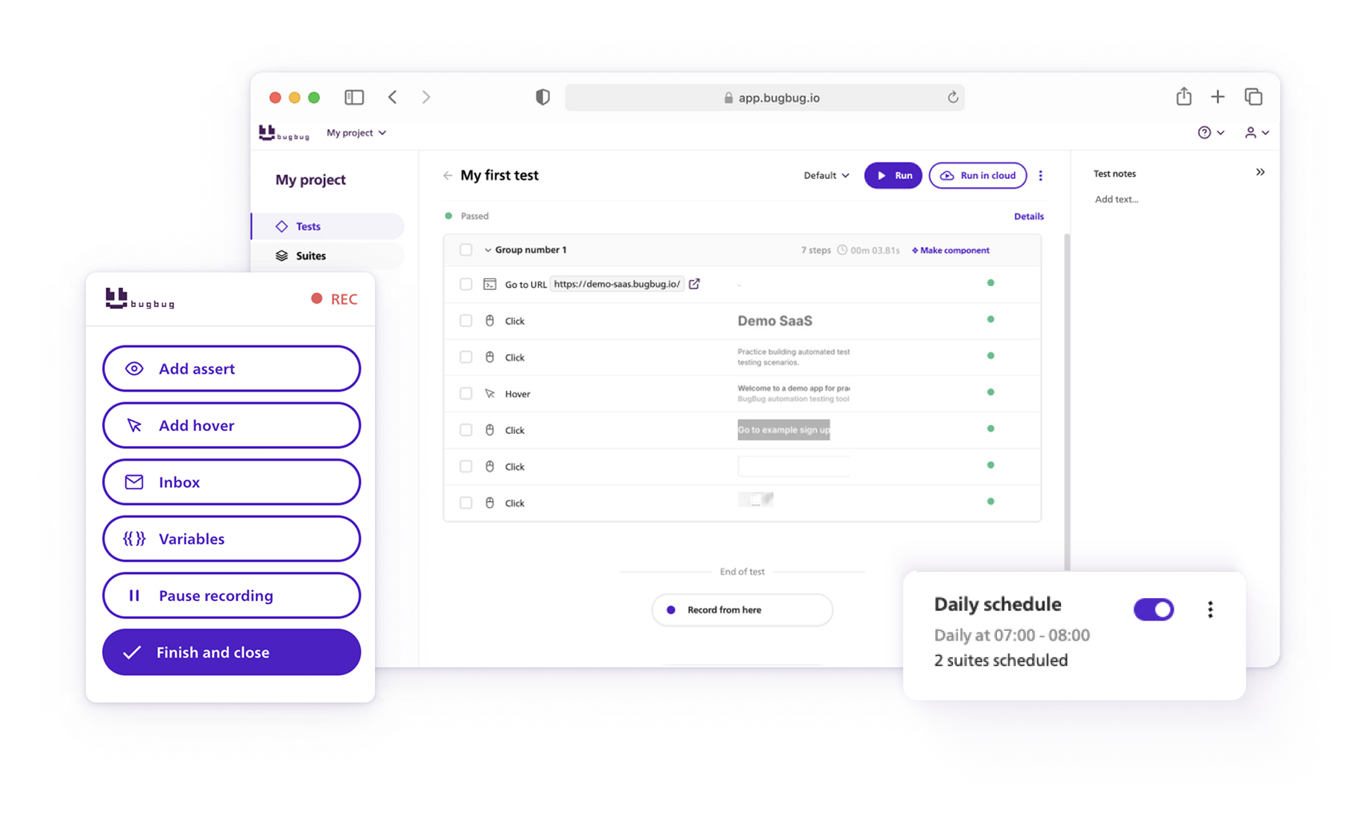
Your next release. Properly tested.
Join 1,200+ QA teams that automated their regression coverage with BugBug.

Dominik Szahidewicz is a Software Quality Evangelist specialising in quality assurance, test automation, and modern software testing practices. He creates practical, research-driven content that helps QA professionals, developers, and product teams improve test coverage, automate repetitive testing, and release more reliable web applications.
Drawing on his experience in technical writing, data analysis, and application consulting, Dominik translates complex testing concepts into clear, actionable guidance. His areas of interest include end-to-end testing, no-code test automation, regression testing, and the use of AI in software quality assurance.
Join thousands of QA experts. Subscribe to our newsletter.
Get more testing tips and product related content. Zero spam.
Discover essential business tools for startups. Read the article to find the right tools for your success.
Learn how to automate regression testing without devs or QA. Discover a risk-based strategy and practical workflows.
Build a CI/CD testing pipeline in 30 minutes with BugBug. Learn how to run reliable E2E smoke tests on every PR, block bad merges, and scale safely.
Build an effective QA strategy aligned with your business goals. Explore best practices in quality assurance and test automation.
Learn how to create a test plan for the testing process of your web application. Discover how to write a test plan with examples in the article.
Read this comprehensive guide on how to choose the right CI/CD tool. Selecting the tool that aligns with your project is essential.
Discover practical strategies to engage developers and product managers in software testing. Learn how collaboration improves product quality.
This article delves into the journey of becoming an Automated Test Engineer, offering insights into the essential skills, knowledge, and steps required to embark on this career path and increase your current salary.
Discover how to calculate ROI for test automation with easy formulas and practical examples. Learn to evaluate costs and track results effectively.