Writing Selenium test cases involves translating business requirements into automated scripts that can be executed to verify the functionality of web applications. Here’s a step-by-step guide to help you understand the process, from interpreting business requirements to writing and selecting test cases for Selenium automation.
TL;DR
- Introduction to Selenium: Selenium is a popular open-source toolset for automating web browsers, supporting multiple programming languages and web browsers for comprehensive test coverage.
- Setting Up and Writing Your First Selenium Test: Start by installing WebDriver, setting up your development environment, writing simple test scripts, and executing them to validate web application functionality.
- Advanced Selenium Testing: Utilize Selenium Grid for cross-platform and cross-browser testing, and organize your scripts into test suites for efficient test management.
- Selecting Test Cases for Automation: Prioritize automating repetitive, high-risk, data-driven, stable, and complex test cases to maximize the efficiency and effectiveness of your testing efforts.
- Writing and Managing Selenium Test Cases: Understand business requirements, identify test scenarios, define detailed test cases, and use Selenium WebDriver to automate and validate these cases for reliable web application testing.
Check also:
- TL;DR
- Introduction to Selenium Test Cases
- What is Selenium?
- Getting Started: Your First Selenium Test
- Building a Test Suite
- Advanced Selenium Testing with Selenium Grid
- Using Selenium IDE
- Test Automation Process
- Cross-Browser and Cross-Platform Testing
- From Business Requirements to Test Cases
- How to Write Test Cases in Selenium?
- Step 1: Define Your Test Case Objectives
- Step 2: Use the Page Object Model (POM) Design Pattern
- Step 3: Write Test Classes Using JUnit or TestNG
- Step 4: Use Explicit Waits for Synchronization
- Step 5: Write Robust Locators
- Step 6: Implement Assertions for Verification
- Step 7: Parameterize Tests for Data-Driven Testing
- Step 8: Organize Tests with Test Suites
- Step 9: Implement Teardown and Cleanup
- Step 10: Integrate Reporting for Test Results
- Step 11: Run Tests in CI/CD Pipelines
- Tips for Writing Reliable Selenium Test Cases
- Selenium Test Case Examples
- How to Write Automation Test Cases in Selenium?
- Test Cases in Selenium - Conclusion
Introduction to Selenium Test Cases
Selenium is one of the most popular tools for test automation in web applications. It allows testers to write automation scripts to interact with web pages and validate their functionality. This tutorial will guide you through the basics of creating Selenium test cases, focusing on the testing process, test scripts, and key concepts such as Selenium Grid, Selenium IDE, and test suites. Whether you are writing your first test or looking to expand your knowledge, this overview will help you get started.
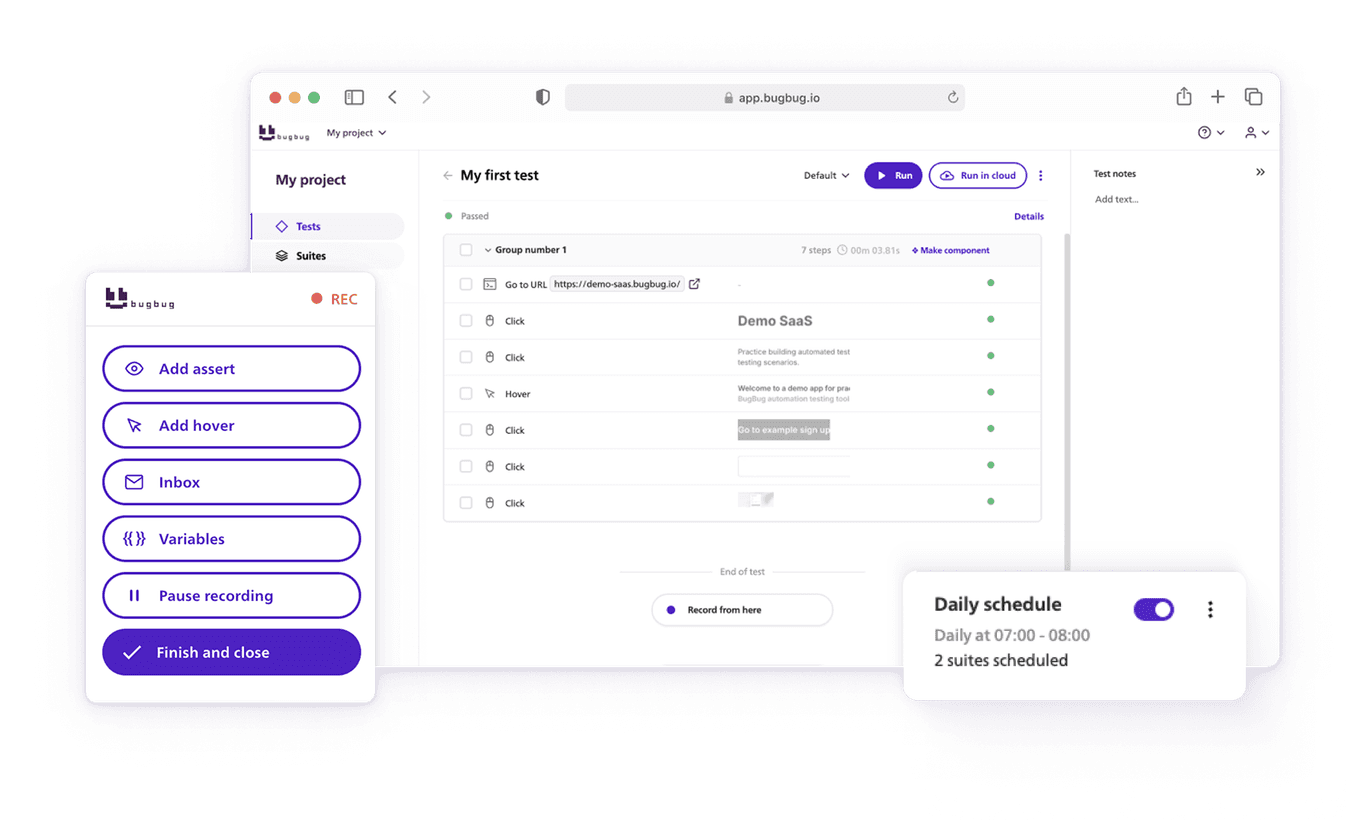
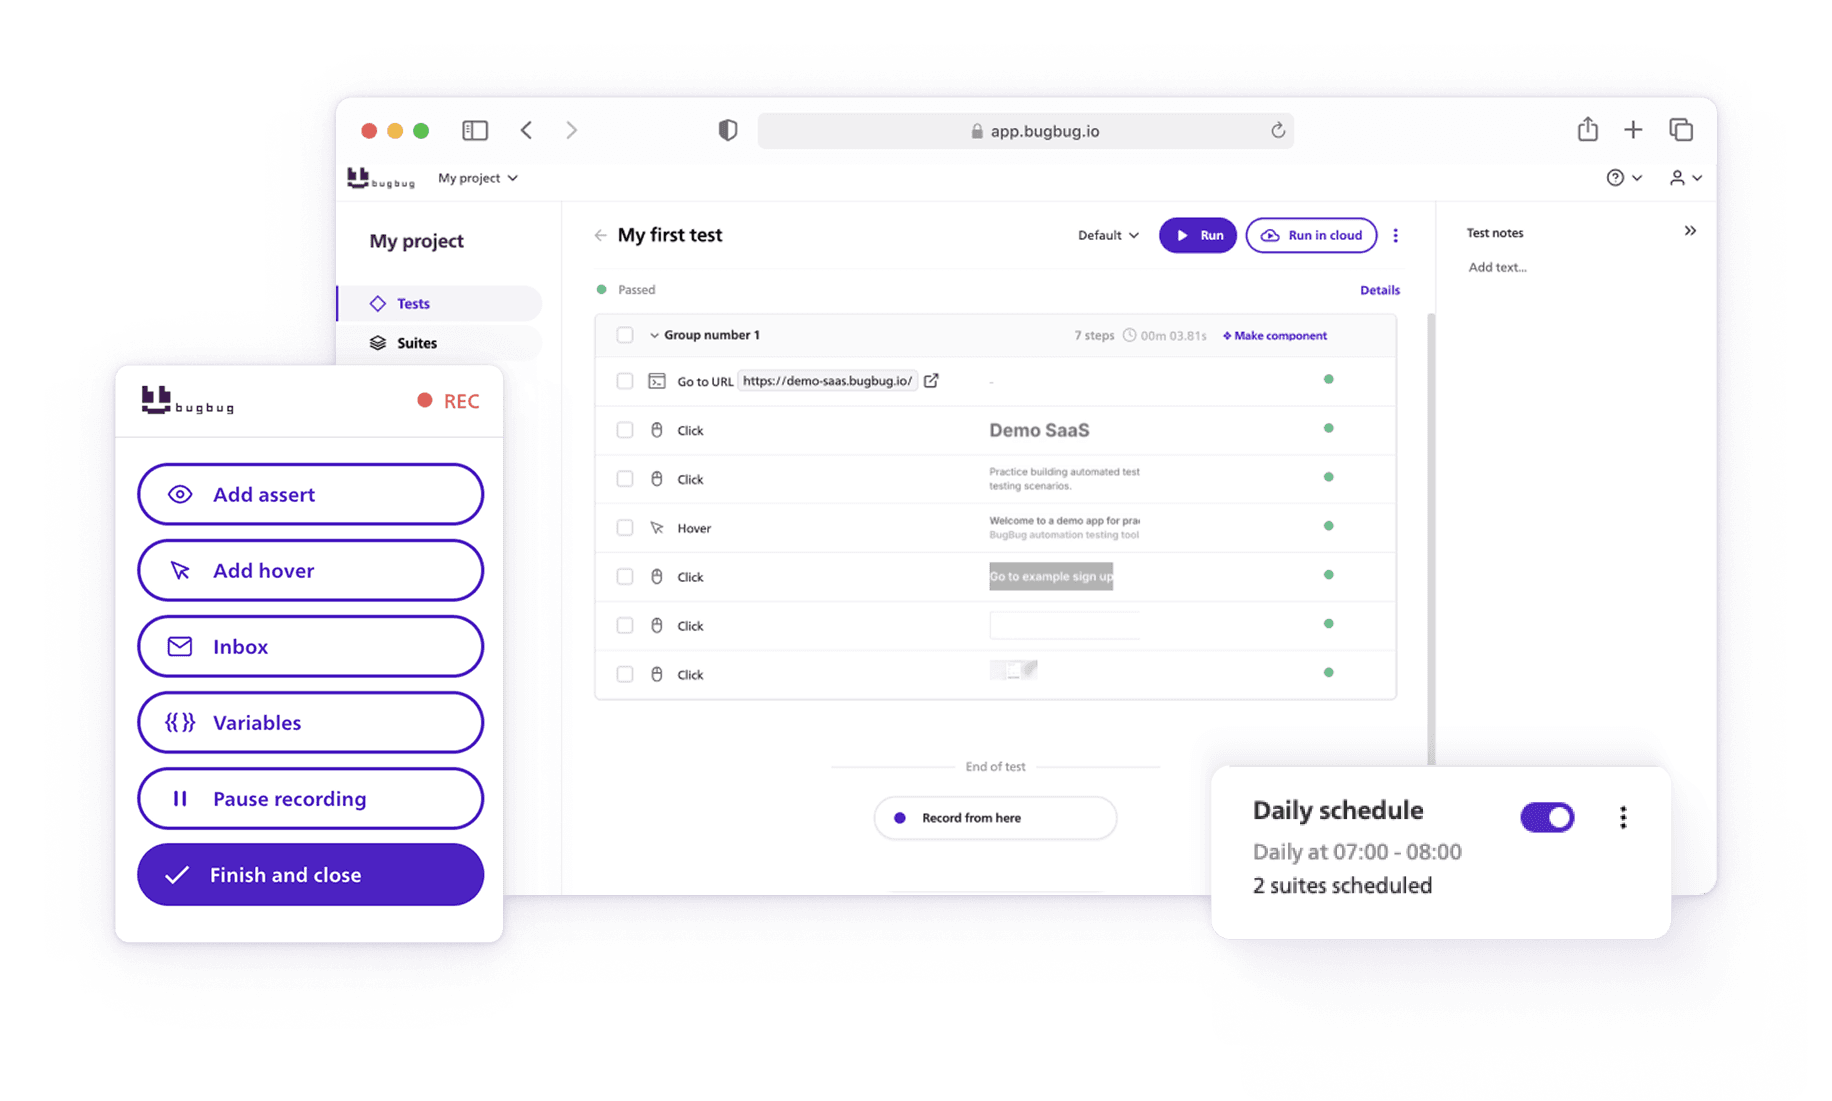
Automate your tests for free
Test easier than ever with BugBug test recorder. Faster than coding. Free forever.
Get started
What is Selenium?
Selenium is an open-source toolset designed to automate web browsers across different operating systems. It supports various programming languages like Java, Python, and Ruby, allowing testers to write test scripts in the language they are most comfortable with. Selenium can automate testing in multiple web browsers such as Chrome, Firefox, Safari, and Edge.
Getting Started: Your First Selenium Test
To begin your journey with Selenium, you first need to set up the test automation environment. Here’s a step-by-step guide to writing your first test using Selenium:
- Install WebDriver: WebDriver is the core component of Selenium that interacts with the web browser. You need to download the WebDriver for the browser you want to test (e.g., ChromeDriver for Google Chrome).
- Set Up Your Development Environment: Choose a programming language (e.g., Ruby), and install the necessary libraries for Selenium. For Ruby, you would install the
selenium-webdrivergem. - Write Your First Test Script: Create a simple test script to automate a basic task, such as logging into a login page. The script would typically include commands to open the browser, navigate to the page, enter credentials, and verify the login was successful.
- Run the Test Script: Execute the script and observe how Selenium interacts with the web browser. The test will automatically open the browser, perform the actions, and close the browser.
Automate your tests for free
Test easier than ever with BugBug test recorder. Faster than coding. Free forever.
Get started
Building a Test Suite
You’ll want to organize your tests into a test suite as they grow. A test suite is a collection of related test scripts that are executed together to ensure comprehensive coverage of the application under test. For example, a test suite for a login feature might include tests for valid login, invalid login, password reset, and security checks.
Advanced Selenium Testing with Selenium Grid
When your application needs to be tested across multiple operating systems and web browsers, Selenium Grid becomes invaluable. Selenium Grid allows you to run parallel tests on different machines, increasing the efficiency of your test automation. It enables you to distribute your test suite across multiple environments, ensuring that your application works consistently across various platforms.
Using Selenium IDE
For those new to Selenium, Selenium IDE is an excellent tool to start with. Selenium IDE is a browser extension that records user interactions with the browser and generates automation scripts without needing to write code manually. It’s perfect for beginners who want to create simple tests quickly. However, as you become more proficient, you’ll likely move on to writing custom test scripts for more complex scenarios.
Test Automation Process
The testing process in Selenium typically follows these steps:
- Test Planning: Define what needs to be tested and determine the scope of the test automation.
- Writing Test Scripts: Create test scripts using Selenium to automate the identified scenarios. This includes writing code to navigate through the application, perform actions, and validate outcomes.
- Organizing Test Cases: Group related tests into test suites to streamline execution.
- Executing Tests: Run the tests in your desired environment. You can use Selenium Grid for cross-platform testing.
- Analyzing Results: Review the test results to identify any failures or issues.
- Maintenance: Update your automation scripts as the application evolves.
Automate your tests for free
Test easier than ever with BugBug test recorder. Faster than coding. Free forever.
Get started
Cross-Browser and Cross-Platform Testing
Selenium is particularly powerful for test automation because it supports cross-browser testing. You can run the same test suite across different web browsers like Chrome and Firefox on various operating systems such as Windows, macOS, and Linux. This ensures your application works seamlessly for all users, regardless of their setup.
From Business Requirements to Test Cases
- Understand Business Requirements: Start by thoroughly understanding the business requirements. Stakeholders typically provide these in the form of user stories, functional specifications, or other documentation. Understanding what the application is supposed to do is crucial.
- Identify Test Scenarios: Break down the requirements into testable scenarios. A test scenario is a high-level description of what needs to be tested. For instance, if a requirement states that a user should be able to log in using valid credentials, the test scenario would be "Test the login functionality with valid and invalid credentials."
- Define Test Cases: For each test scenario, define specific test cases. A test case includes detailed steps, input data, and expected results. It’s a more granular level of testing compared to a scenario.
How to Write Test Cases in Selenium?
Step 1: Define Your Test Case Objectives
Before writing code, clearly outline the objectives of each test case. This includes:
- Test Purpose: E.g., verifying the login functionality.
- Expected Result: Describe what the application should display or do if the test passes.
- Preconditions: Ensure any setup required (e.g., valid login credentials, specific user roles).
- Test Steps: Outline the steps the test will perform.
Step 2: Use the Page Object Model (POM) Design Pattern
The Page Object Model is a best practice in Selenium that encourages separating the test code from the web element locators and actions. For each page, create a class representing that page, encapsulating the elements and methods that interact with them. This makes tests more maintainable, as UI changes require updates only in the page object, not across all tests.
-
Example Directory Structure:
├── src │ ├── main │ │ └── java │ │ ├── pages │ │ │ ├── LoginPage.java │ │ │ └── DashboardPage.java │ ├── test │ │ └── java │ │ ├── LoginTest.java
Sample Page Object Class: LoginPage.java
public class LoginPage { private WebDriver driver; // Locators private By usernameField = By.id("username"); private By passwordField = By.id("password"); private By loginButton = By.id("loginButton"); // Constructor public LoginPage(WebDriver driver) { this.driver = driver; } // Page Actions public void enterUsername(String username) { driver.findElement(usernameField).sendKeys(username); } public void enterPassword(String password) { driver.findElement(passwordField).sendKeys(password); } public void clickLogin() { driver.findElement(loginButton).click(); } }
Step 3: Write Test Classes Using JUnit or TestNG
Create a test class for each functionality and structure it with @Before, @Test, and @After annotations (JUnit) or @BeforeMethod, @Test, and @AfterMethod (TestNG). This ensures each test has a clear setup and teardown process.
Example Test Class: LoginTest.java
import org.junit.Before; import org.junit.After; import org.junit.Test; import static org.junit.Assert.assertTrue; public class LoginTest { private WebDriver driver; private LoginPage loginPage; @Before public void setUp() { driver = new ChromeDriver(); driver.manage().window().maximize(); driver.get("https://example.com/login"); loginPage = new LoginPage(driver); } @Test public void testValidLogin() { loginPage.enterUsername("testuser"); loginPage.enterPassword("testpassword"); loginPage.clickLogin(); assertTrue(driver.getTitle().contains("Dashboard")); } @After public void tearDown() { driver.quit(); } }
Step 4: Use Explicit Waits for Synchronization
Explicit waits help to make tests reliable by waiting only as long as necessary for a specific condition to be met. Avoid Thread.sleep() as it’s not flexible and slows down tests.
WebDriverWait wait = new WebDriverWait(driver, Duration.ofSeconds(10)); wait.until(ExpectedConditions.visibilityOfElementLocated(By.id("dashboard")));
Step 5: Write Robust Locators
Choosing the right locators (preferably id or name attributes) is crucial to making tests reliable. Avoid using xpath or cssSelector unless absolutely necessary, as they’re more brittle with UI changes.
Step 6: Implement Assertions for Verification
Use assertions to validate that the actual outcome matches the expected outcome. Java and Python frameworks have built-in assertion libraries:
-
JUnit (Java):
assertTrue(driver.getTitle().contains("Dashboard")); -
TestNG (Java):
Assert.assertEquals(driver.getTitle(), "Dashboard");
Step 7: Parameterize Tests for Data-Driven Testing
Using data-driven testing lets you run the same test logic with multiple data sets. JUnit and TestNG support parameterized tests.
@DataProvider(name = "loginData") public Object[][] loginData() { return new Object[][] { {"testuser1", "password1"}, {"testuser2", "password2"} }; } @Test(dataProvider = "loginData") public void testLogin(String username, String password) { loginPage.enterUsername(username); loginPage.enterPassword(password); loginPage.clickLogin(); assertTrue(driver.getTitle().contains("Dashboard")); }
Step 8: Organize Tests with Test Suites
Test suites allow you to organize multiple test cases into a single suite to be run together. This is useful for grouping related tests, such as regression, smoke, or end-to-end tests.
JUnit Suite Example:
@RunWith(Suite.class) @Suite.SuiteClasses({ LoginTest.class, DashboardTest.class }) public class TestSuite { // The suite runner will run all specified test classes }
Step 9: Implement Teardown and Cleanup
Always close the browser after each test to prevent memory leaks and ensure tests run in isolation. In JUnit, use @After; in TestNG, use @AfterMethod.
@After public void tearDown() { if (driver != null) { driver.quit(); } }
Step 10: Integrate Reporting for Test Results
Use reporting tools like Allure or TestNG’s reporting feature to visualize test results and capture screenshots for failed test cases. This is crucial for debugging and reviewing test outcomes.
Step 11: Run Tests in CI/CD Pipelines
Automate tests by integrating them into CI/CD tools like Jenkins, GitLab CI, or GitHub Actions. Configure tests to run automatically on each commit or deployment to ensure early detection of issues.
Tips for Writing Reliable Selenium Test Cases
- Modularize Code: Use helper methods to reuse code and reduce duplication.
- Avoid Hard-Coded Values: Store test data in a configuration file or external file.
- Enable Logging: Add logging statements for debugging and tracing test flow.
- Handle Pop-ups and Alerts: Use Selenium’s
Alertclass to manage unexpected browser alerts. - Regularly Update Locators: Update locators as the application evolves to avoid test failures.
This structured approach will help ensure that your Selenium test cases are reliable, maintainable, and easy to understand.
Selenium Test Case Examples
Here are several examples of Selenium test cases written in different programming languages (Java, Python, and C#). These examples demonstrate common test scenarios such as login validation, form submission, and error message validation.
Selenium Test Cases for Login Page
Java with TestNG:
import org.openqa.selenium.By; import org.openqa.selenium.WebDriver; import org.openqa.selenium.WebElement; import org.openqa.selenium.chrome.ChromeDriver; import org.testng.Assert; import org.testng.annotations.AfterTest; import org.testng.annotations.BeforeTest; import org.testng.annotations.Test; public class LoginTest { WebDriver driver; @BeforeTest public void setup() { System.setProperty("webdriver.chrome.driver", "path/to/chromedriver"); driver = new ChromeDriver(); } @Test public void testValidLogin() { driver.get("https://example.com/login"); WebElement username = driver.findElement(By.id("username")); WebElement password = driver.findElement(By.id("password")); WebElement loginButton = driver.findElement(By.id("loginButton")); username.sendKeys("validUsername"); password.sendKeys("validPassword"); loginButton.click(); // Assert the user is redirected to the dashboard String expectedUrl = "https://example.com/dashboard"; Assert.assertEquals(driver.getCurrentUrl(), expectedUrl); } @AfterTest public void tearDown() { driver.quit(); } }
Python with PyTest:
from selenium import webdriver import pytest class TestLogin: @pytest.fixture(scope="class") def setup(self): self.driver = webdriver.Chrome(executable_path='path/to/chromedriver') yield self.driver.quit() def test_valid_login(self, setup): self.driver.get("https://example.com/login") self.driver.find_element_by_id("username").send_keys("validUsername") self.driver.find_element_by_id("password").send_keys("validPassword") self.driver.find_element_by_id("loginButton").click() # Assert the user is redirected to the dashboard assert self.driver.current_url == "https://example.com/dashboard"
C# with NUnit:
using NUnit.Framework; using OpenQA.Selenium; using OpenQA.Selenium.Chrome; namespace SeleniumTests { public class LoginTests { IWebDriver driver; [SetUp] public void Setup() { driver = new ChromeDriver("path/to/chromedriver"); } [Test] public void ValidLogin() { driver.Navigate().GoToUrl("https://example.com/login"); driver.FindElement(By.Id("username")).SendKeys("validUsername"); driver.FindElement(By.Id("password")).SendKeys("validPassword"); driver.FindElement(By.Id("loginButton")).Click(); // Assert the user is redirected to the dashboard Assert.AreEqual("https://example.com/dashboard", driver.Url); } [TearDown] public void TearDown() { driver.Quit(); } } }
Form Submission Test Case
Java with TestNG:
@Test public void testFormSubmission() { driver.get("https://example.com/form"); WebElement nameField = driver.findElement(By.id("name")); WebElement emailField = driver.findElement(By.id("email")); WebElement submitButton = driver.findElement(By.id("submit")); nameField.sendKeys("John Doe"); emailField.sendKeys("john.doe@example.com"); submitButton.click(); // Assert that the form was submitted successfully WebElement successMessage = driver.findElement(By.id("successMessage")); Assert.assertTrue(successMessage.isDisplayed()); }
Python with PyTest:
def test_form_submission(self, setup): self.driver.get("https://example.com/form") self.driver.find_element_by_id("name").send_keys("John Doe") self.driver.find_element_by_id("email").send_keys("john.doe@example.com") self.driver.find_element_by_id("submit").click() # Assert that the form was submitted successfully success_message = self.driver.find_element_by_id("successMessage") assert success_message.is_displayed()
C# with NUnit:
[Test] public void TestFormSubmission() { driver.Navigate().GoToUrl("https://example.com/form"); driver.FindElement(By.Id("name")).SendKeys("John Doe"); driver.FindElement(By.Id("email")).SendKeys("john.doe@example.com"); driver.FindElement(By.Id("submit")).Click(); // Assert that the form was submitted successfully var successMessage = driver.FindElement(By.Id("successMessage")); Assert.IsTrue(successMessage.Displayed); }
Error Message Validation Test Case
Java with TestNG:
@Test public void testErrorMessage() { driver.get("https://example.com/login"); WebElement loginButton = driver.findElement(By.id("loginButton")); loginButton.click(); // Assert that the error message is displayed WebElement errorMessage = driver.findElement(By.id("errorMessage")); Assert.assertTrue(errorMessage.isDisplayed()); }
Python with PyTest:
def test_error_message(self, setup): self.driver.get("https://example.com/login") self.driver.find_element_by_id("loginButton").click() # Assert that the error message is displayed error_message = self.driver.find_element_by_id("errorMessage") assert error_message.is_displayed()
C# with NUnit:
[Test] public void TestErrorMessage() { driver.Navigate().GoToUrl("https://example.com/login"); driver.FindElement(By.Id("loginButton")).Click(); // Assert that the error message is displayed var errorMessage = driver.FindElement(By.Id("errorMessage")); Assert.IsTrue(errorMessage.Displayed); }
Navigation Test Case
Java with TestNG:
@Test public void testNavigation() { driver.get("https://example.com"); WebElement aboutLink = driver.findElement(By.linkText("About Us")); aboutLink.click(); // Assert that the user is navigated to the "About Us" page String expectedUrl = "https://example.com/about"; Assert.assertEquals(driver.getCurrentUrl(), expectedUrl); }
Python with PyTest:
def test_navigation(self, setup): self.driver.get("https://example.com") self.driver.find_element_by_link_text("About Us").click() # Assert that the user is navigated to the "About Us" page assert self.driver.current_url == "https://example.com/about"
C# with NUnit:
[Test] public void TestNavigation() { driver.Navigate().GoToUrl("https://example.com"); driver.FindElement(By.LinkText("About Us")).Click(); // Assert that the user is navigated to the "About Us" page Assert.AreEqual("https://example.com/about", driver.Url); }
Automate your tests for free
Test easier than ever with BugBug test recorder. Faster than coding. Free forever.
Get started
How to Write Automation Test Cases in Selenium?
Not all test cases are suitable for automation. Here's how to select them:
- Repetitive Tests: Choose test cases that need to be executed frequently, such as regression tests.
- High-Risk Conditions: Automate test cases that cover critical functionality, where a failure would have a significant impact.
- Data-Driven Tests: Test cases that require multiple data sets are ideal for automation.
- Stable Features: Focus on features that are stable and not likely to change frequently.
- Complex Scenarios: Automate scenarios that are complex and time-consuming to execute manually.
Test Cases in Selenium - Conclusion
By learning how to configure Selenium WebDriver and working with the WebDriver protocol, testers can create powerful selenium test scripts that significantly reduce execution time compared to manual testing. Whether you're writing your first test case or refining a test automation framework, understanding the best practices for selenium developers is essential.
Using an integrated development environment like Eclipse IDE allows you to efficiently write scripts in languages such as Java. With Selenium 4, selenium provides enhanced capabilities that further streamline the execution of test cases. Tools like Selenium IDE and Selenium RC offer a foundation for those new to selenium automation testing and provide an entry point into more advanced topics, such as cross-browser testing and the Page Object Model.
Automate your tests for free
Test easier than ever with BugBug test recorder. Faster than coding. Free forever.
Get started
To successfully write and execute Selenium test cases, start by understanding the business requirements, break them down into test scenarios and test cases, and then use Selenium WebDriver to automate these cases. Select cases for automation based on their frequency, criticality, and complexity. Writing effective Selenium test cases ensures that your web application is thoroughly tested and any issues are identified early in the development process.
Happy (automated) testing!