We’ve prepared a short guide with essential recommendations on test automation that we created specifically for startups. We divided the guide into 3 levels:
Also see our guide dedicated to the beginners: tutorial to automation testing with BugBug
What will you achieve on Level 1?
After finishing this level you will run 5-10 automated tests every hour and check if your core features are working properly. You will detect production bugs with big impact on users sooner than before.
🎯 TL;DR
-
Start with short and simple tests that check your core features
-
Remember about recording “hover”
-
Create special test user accounts dedicated to automation
-
Schedule the tests to run every hour
-
Incrementally add more test
Focus on the most important features
Many companies spend endless hours on a neverending pursuit to automate everything. This leads to very costly automation that requires a whole team to create and maintain. Don’t be like these companies and keep it simple. Agile startups should start with automated testing of the most essential functionality.
👍 Rule of thumb:
Usually, it just takes 5 to 10 automated tests to be sure that most users are able to achieve their goals.
What should you test?
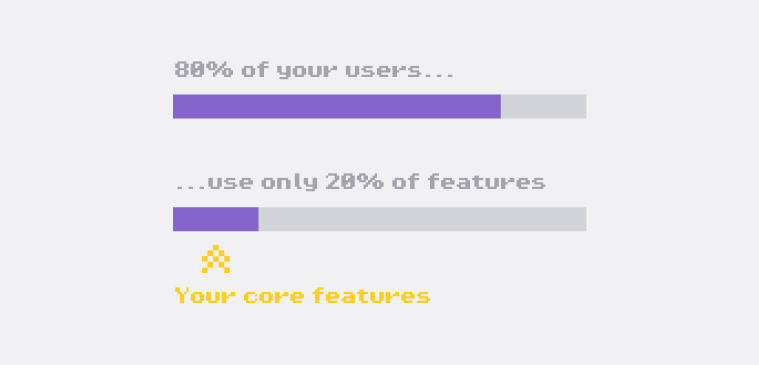
Think of your features. What percentage of users are using a particular feature? If the answer is higher than 80%, then this is a core feature. The goal of automating tests of such important features is to make sure that you can detect bugs that have a huge impact on your business as soon as possible (new user registration is for sure a core feature, but it’s a little bit more tricky to automate, which we will cover in the next episode)
Pick your first 5 tests (copy this checklist)
Login → dashboard → checkout → settings → critical search/filter. Start with flows used by 80%+ of users.
Get started
Start with short & atomic tests
When you record your first tests start with something very simple and atomic. Atomic means that the test is small, independent and checks just one thing.
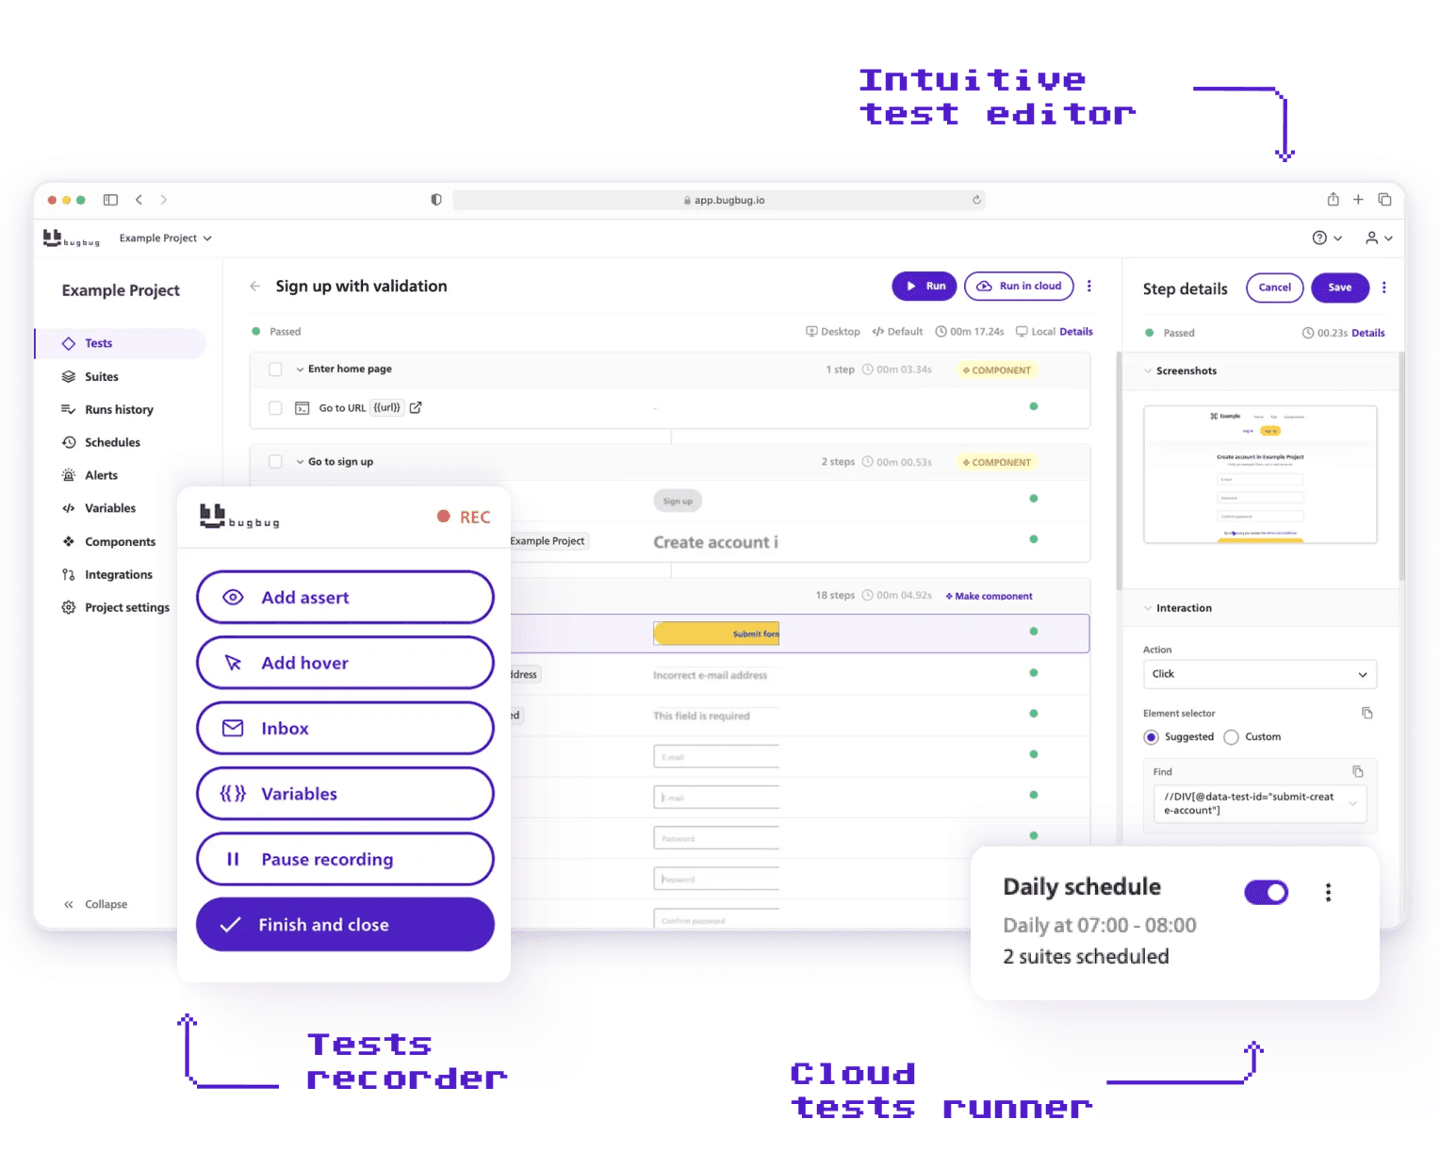
A good idea is to start with testing the basic navigation of your landing page. Click “record” and create a test that just clicks one item of your navigation link in the menu. Add assertion for some text in a heading. Finish the test and run it. Awesome! You’ve created your first automated test that touches the most essential area of your business!

Now create a separate test for each navigation link. Here are screenshots of how BugBug team set up their landing page tests.

Don’t forget about recording hovers
If your website navigation appears on hover, you need to tell BugBug that you want to record a mouse moving to a specific element. To do this you need to click “Hover” during the recording and then click an element. When running the test, BugBug will move the mouse cursor to this element.

Create special test users
Another idea is to test if login works. Create a separate test that only checks that one thing.
To achieve that you need to prepare a “test user” - a user account that is dedicated only to testing if login works properly
- Manually register a new user with a new unique email, for example with john.smith+testautomation@email.com (you can use disposable mail or plus aliasing)
- Go to BugBug and record a test that clicks the login button, enters the user login and password and submits the form
- Add an assertion for some text that confirms that the login was successful
- Finish your test
You might be tempted to test other features in the same test, but don’t do this now. We want to be sure that the login test is atomic and independent from other features.
Remember that you can create as many test users as needed. For example, if your product offers multiple combinations of preferences, you can create a separate user for each combination.
👍 Rule of thumb:
Always create new test users if this leads to less test steps
Schedule all tests to run every hour
With BugBug you just need a couple of clicks to start running the tests every hour. Just go to “Schedules”, select the “Hourly” one and add “All tests”.

That’s it, now you will start getting emails every hour with the results of your test automation. Tip: create a filter on your email account so that you avoid inbox clutter or configure notifications to only get an email on failures.

Incrementally add more tests
You’ve successfully created test automation that monitors your production! Now keep adding more short tests one by one. Don’t forget to focus on being cost-effective - if you have trouble automating a use case, skip it and go to the next one or find a different way of checking if it works. And remember: you can always ask BugBug support to help you with any troubles.