Your Shopify store goes down, or worse — it half-works. The checkout stalls. The cart silently swallows add-to-cart clicks. The discount code field accepts the input but doesn't apply anything.
None of this shows up on uptime monitoring. The store is "up." Your status page is green. The first person who knows about the failure is the customer who abandoned their order.
This guide walks you through setting up real functional monitoring for a Shopify store using BugBug — no code required. You'll cover the five flows that break most often (cart, checkout, discount codes, registration, password reset), handle Shopify's three main automation blockers (bot protection, cookie consent, checkout DOM isolation), and have monitoring running with Slack alerts in under two hours. If you're on a developer team evaluating Playwright instead, there's an honest comparison of both approaches below.
Also check:
- BugBug vs. Playwright for Shopify Monitoring — Quick Comparison
- What Makes Shopify Hard to Monitor
- How BugBug Handles Shopify Bot Protection
- How to Handle Shopify Consent Popups
- Setting Up Safe Checkout Testing
- Recording Your Core Shopify Tests in BugBug
- Connecting Slack Alerts
- Monitoring Shopify with Playwright
- Troubleshooting Common Shopify Test Failures
- Know Before Your Customers Do
- FAQ
BugBug vs. Playwright for Shopify Monitoring — Quick Comparison
These are the two tools most Shopify teams end up evaluating. Before diving into setup, here's where they actually differ — so you can decide upfront which approach fits your team.
| BugBug | Playwright | |
|---|---|---|
| Setup time | Under 2 hours | 1–2 days |
| Coding required | No | Yes — JavaScript / TypeScript |
| Who maintains tests | Anyone on the team | Developer or QA engineer |
| Bot protection method | Real browser fingerprint | HTTP signature headers + stealth plugin |
| Consent popup handling | Recorded step or JS cookie | page.addLocatorHandler() or fixture |
| Cross-browser coverage | Chromium only | Chromium, Firefox, Safari |
| Mobile testing | No | Yes — viewport emulation |
| Email flow testing | Built-in via bugbug-inbox.com | Requires separate tooling |
| Scheduling | Built-in cloud runs | CI cron job required |
| Debugging | Screenshots, step replay | Full trace viewer, network logs, DOM snapshots |
| Free tier | Yes — unlimited tests, local runs | Open-source; CI hosting costs apply |
| Network request monitoring | Via failure screenshots | Native API monitoring + request interception |
Choose BugBug if your team doesn't have a developer owning a test codebase, you need monitoring running today, or email flow validation is part of what you're testing.
Choose Playwright if your store has aggressive bot protection requiring HTTP header signing, you need cross-browser or mobile coverage, or your checkout branches significantly and needs programmatic test logic.
Both are legitimate. The rest of this guide covers the BugBug setup end to end.
What Makes Shopify Hard to Monitor
Shopify stores aren't like standard web apps. The platform introduces three obstacles that standard browser automation doesn't account for.
Bot protection — Shopify evaluates incoming traffic based on IP reputation, request patterns, and browser fingerprinting. Monitoring that runs from cloud infrastructure gets treated with suspicion — you can end up with 429 Too Many Requests on cart API calls, Cloudflare challenge pages, or the subtler failure where the page shell renders but interactive elements are broken. The search returns zero results. The mini-cart notification never fires. No error. Just wrong.
Cookie consent interception — Shopify's privacy SDK fires on every page load. The consent banner appears and blocks script execution until the visitor accepts. If your test doesn't handle this, it doesn't fail loudly — it just stalls, times out, or clicks the wrong element because the banner was sitting on top of it.
Checkout DOM isolation — Shopify's checkout runs on checkout.shopify.com, a completely separate domain with its own markup. The selectors and flows you build on the storefront don't transfer. And Shopify periodically updates the checkout structure — selectors that worked last quarter may be gone today.
Each section below covers one of these problems and how to handle it in BugBug.
How BugBug Handles Shopify Bot Protection
BugBug runs tests in a real Chromium browser, not a headless instance. Real browsers present a full browser fingerprint: correct user-agent strings, standard canvas rendering, realistic WebGL signatures, all the properties that bot detection fingerprinters check. Headless Playwright (without the stealth plugin) leaves fingerprint gaps that Shopify's bot detection notices.
For most Shopify stores, BugBug's real browser execution passes bot detection without any additional configuration.
When you still hit bot protection in cloud runs
Cloud runs originate from shared datacenter IP ranges. Even with a real browser fingerprint, some Shopify stores with aggressive Cloudflare configurations will still rate-limit or challenge requests from those IPs.
If your cloud-scheduled BugBug tests return a Cloudflare challenge page or a blank storefront:
- Run locally first. BugBug lets you run tests on your local machine at no cost. Your home or office IP won't trigger Shopify's datacenter IP filters. If the test passes locally but fails in the cloud, the problem is almost certainly IP-based bot protection, not your test logic.
- Adjust your cloud run frequency. Aggressive rate limits often kick in when the same IP hits the same endpoints repeatedly in a short window. Spacing cloud runs to every 30 minutes instead of every 5 reduces the signal that triggers rate limiting. Learn more about schedules.
- Use a test-specific product with no app logic attached. If bot protection is blocking your cart API calls specifically — you'll see a 429 in your failure screenshots — a bare test product with no app rules applied often resolves it.
The Playwright alternative: HTTP header signing
It's worth knowing the approach Playwright teams use, because it's relevant context if your store has truly aggressive bot protection that local runs and frequency adjustment can't resolve.
Shopify provides official HTTP crawler-signature headers (X-Shopify-Access-Token and related headers) that authorize monitoring traffic at the infrastructure level. Teams using Playwright inject these headers via their secrets manager into every request — bypassing Cloudflare IP checks entirely, regardless of the originating IP.
BugBug doesn't support HTTP header injection. If your Cloudflare configuration is strict enough that it blocks datacenter IPs regardless of browser fingerprint, Playwright with header signing is the only clean long-term solution. For most Shopify stores, BugBug's real-browser fingerprint is sufficient and requires no configuration — but that's the trade-off to know upfront.
How to Handle Shopify Consent Popups
The cookie consent banner is invisible in manual testing — you dismissed it weeks ago and your browser remembers. In automated tests, it appears every time and silently breaks flows by sitting on top of the elements your test is trying to click.
BugBug handles this at the recording level rather than with a programmatic handler.
Option 1: Record the dismissal as the first step
Open BugBug, start recording, and your first action is to click the consent banner's close button or accept all. BugBug records this as a real test step. It runs at the start of every test execution.
This is the simplest approach and works reliably. The only maintenance required: if your consent banner's close button changes (theme update, CMP provider change), you update that one step.
One thing to check: make sure the consent step is set to non-blocking if the banner fails to appear. If the consent cookie is already set in the test browser session, the banner won't show — and a hard assertion on the close button will fail the test before it's started. In BugBug, mark the consent step as optional so the rest of the test runs regardless.
Option 2: Set the consent cookie with a JavaScript step
For Shopify stores using the native Shopify Privacy API, the consent state is stored in a cookie. Set it before navigation and the banner never fires.
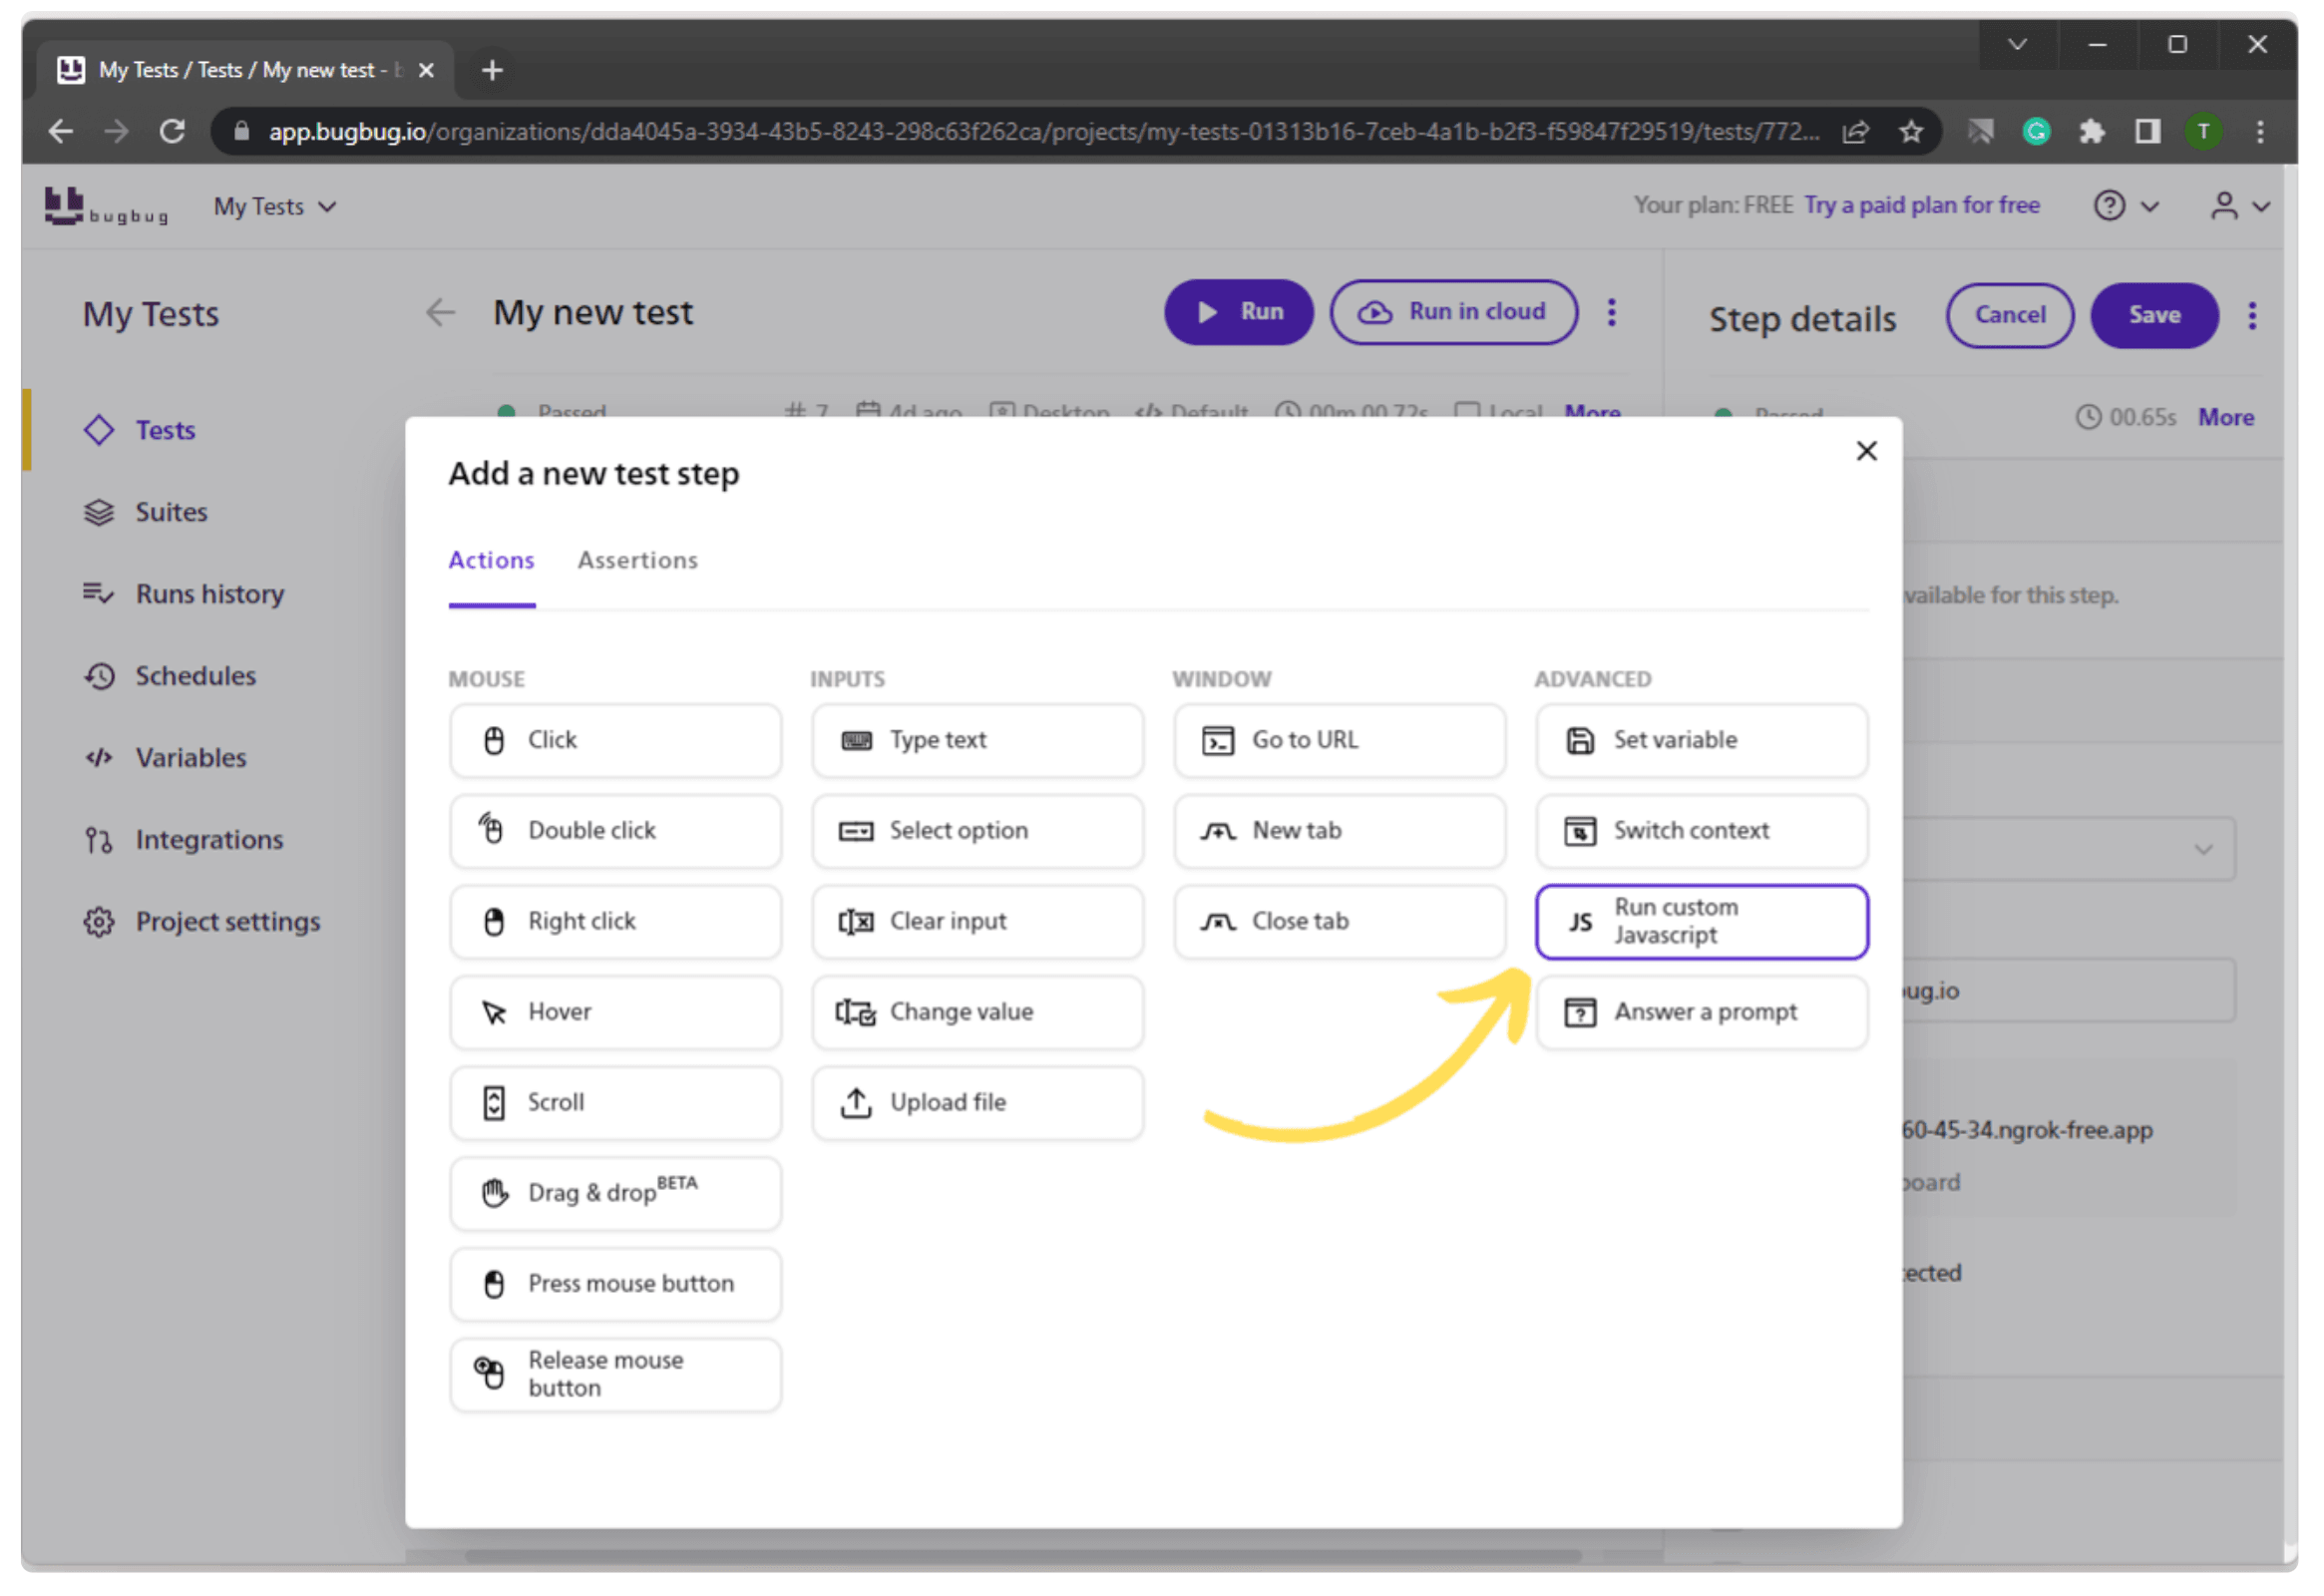
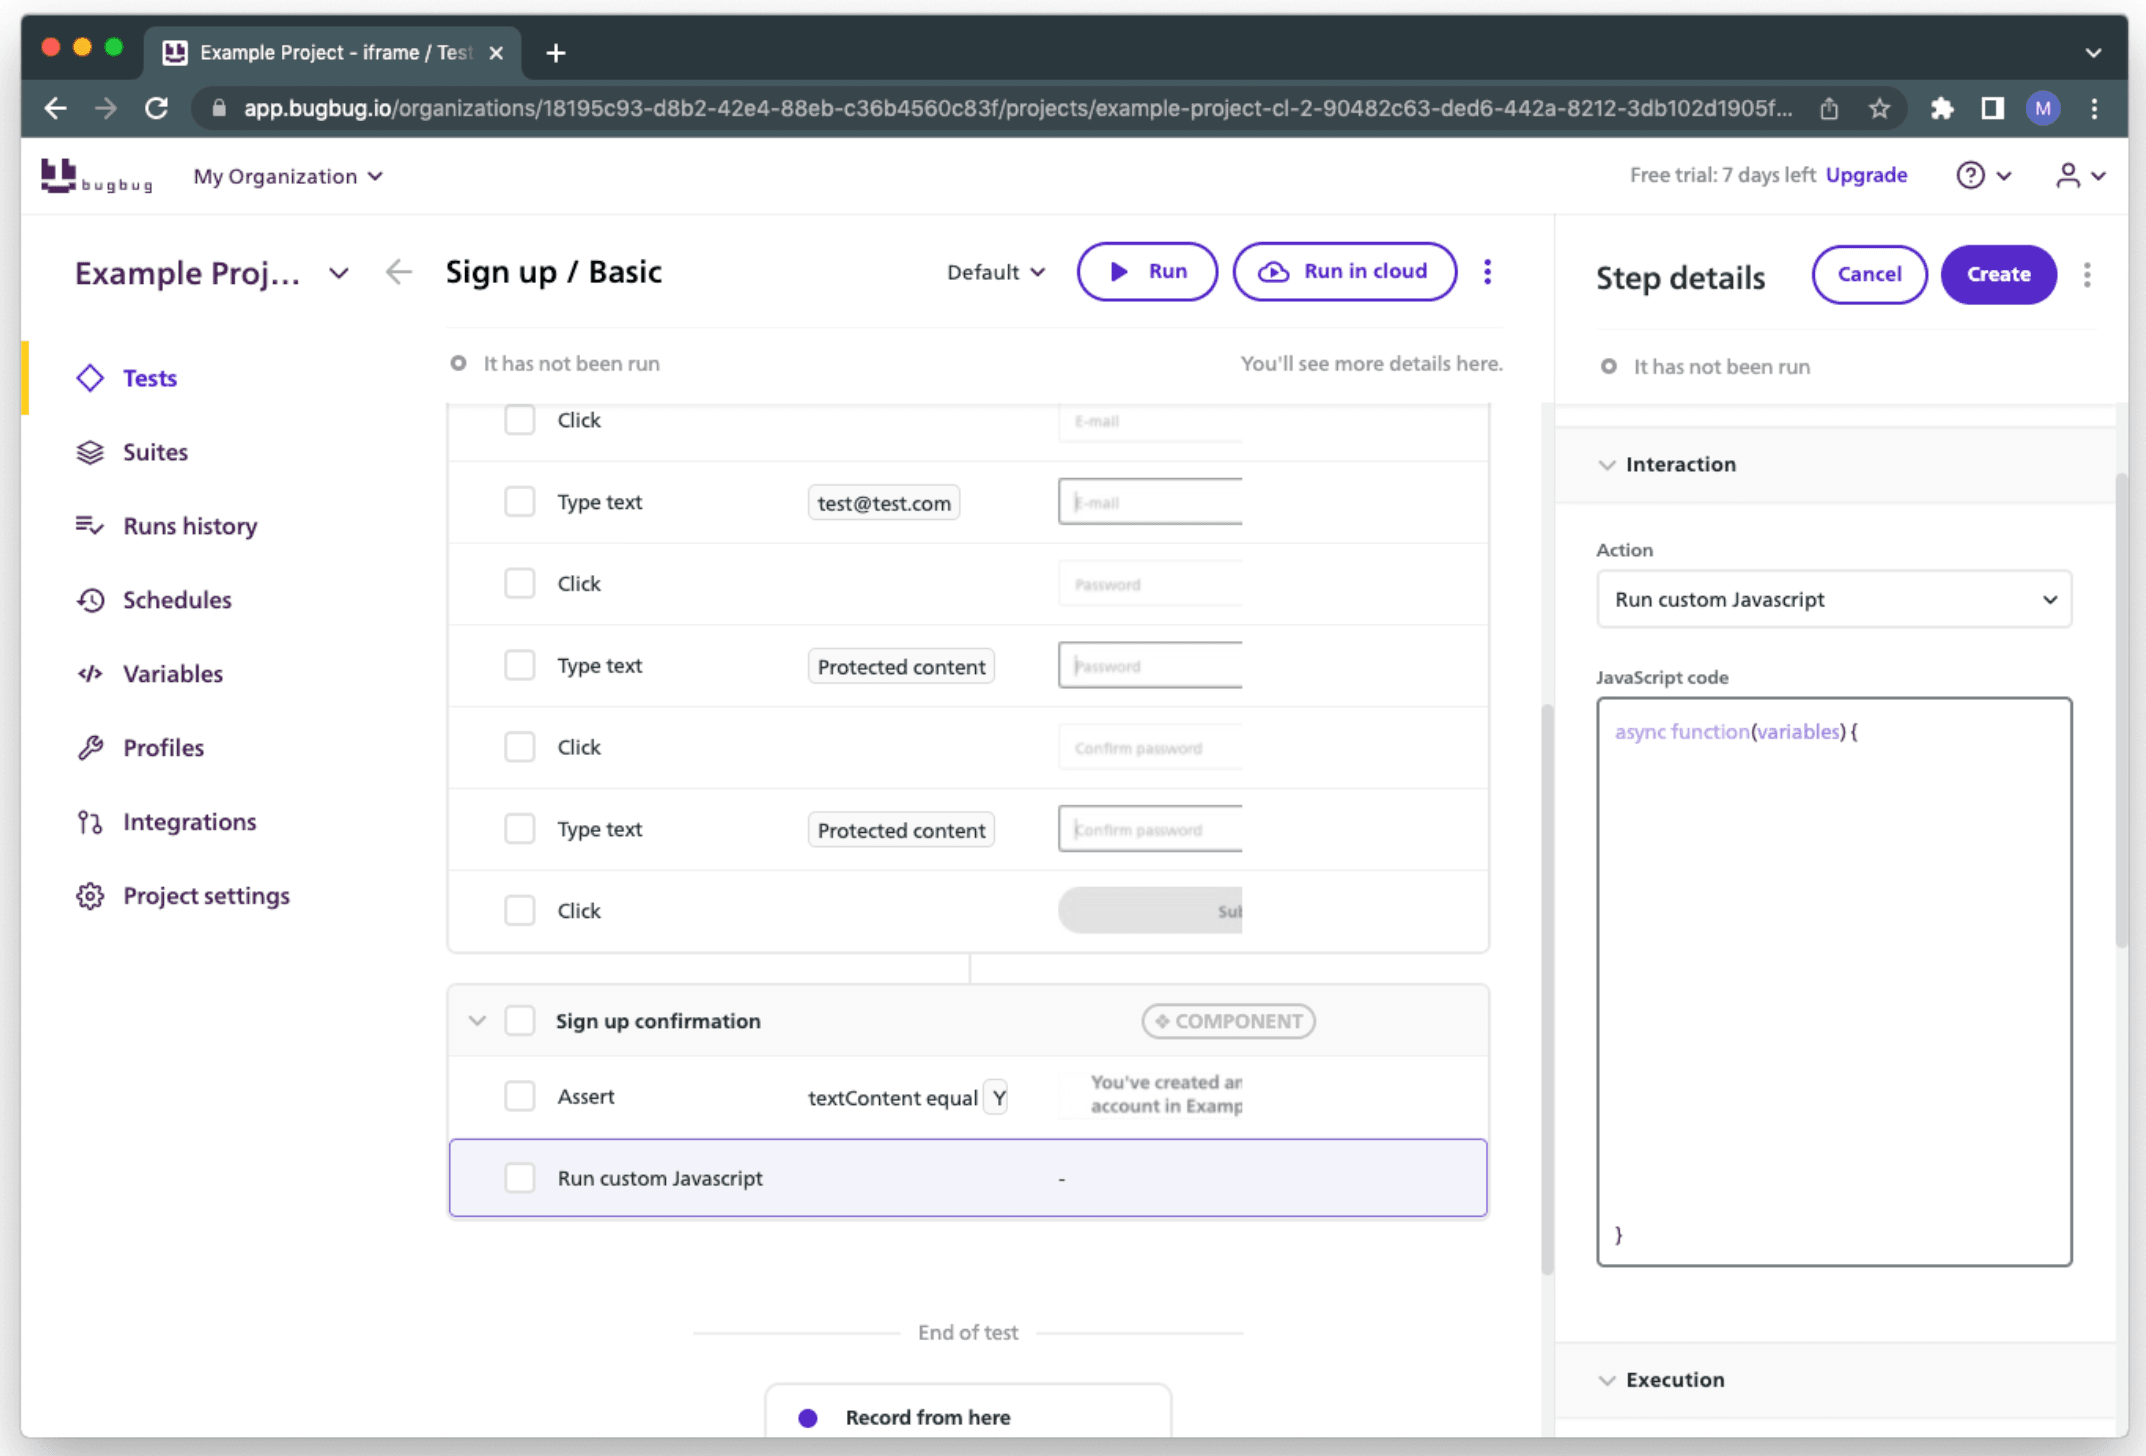
BugBug supports Custom JavaScript steps. At the start of your test, add a JS step:
document.cookie = "_shopify_y=accepted; domain=.yourstore.myshopify.com; path=/";
The exact cookie name varies by your Consent Management Platform. Check your browser's DevTools → Application → Cookies after manually dismissing the banner to find the one yours uses.
This is the cleaner option if multiple test suites share the same start URL and you don't want to record the dismissal in every one of them.
👉 Check our docs for a more in-depth description of JavaScript actions.
Setting Up Safe Checkout Testing
Checkout is the flow that matters most and the one you most want to avoid running against real payment processing.
Use Shopify's Bogus Gateway
Shopify provides a test payment gateway for stores in development mode. It accepts a fixed test card number and processes a full checkout flow without real payment.
Enable it: Shopify Admin → Settings → Payments → Choose third-party provider → Bogus Gateway.
Test card details:
- Card number: 1
- Name: anything
- Expiry: any future date
- CVV: any 3 digits
Create a dedicated test customer account
Don't use your own account for automated checkout monitoring. Create a dedicated test customer in Shopify Admin, use it consistently across all checkout tests. Test orders are easy to filter out, and if the account gets flagged by Shopify's fraud detection it doesn't affect your own access.
For production stores: use Shopify Flow to clean up test orders
If you need to run checkout monitoring against your live production store because staging doesn't match production exactly, automate order cleanup with Shopify Flow:
- Create a dedicated test customer email (e.g., bugbug-monitor@yourcompany.com)
- Set up a Flow automation: trigger on Order Created → condition: customer email equals your test email → action: refund and cancel the order
Every checkout test run creates a real order. Flow immediately refunds and cancels it. Your inventory is unaffected, the checkout flow is real end-to-end, and your order admin stays clean. You'll need a company card attached to the test account.
Recording Your Core Shopify Tests in BugBug
With bot protection handled, the consent popup managed, and a safe checkout strategy in place, here's how to set up the five flows every Shopify store should be monitoring.
Prerequisites before you start:
- BugBug Chrome extension installed
- BugBug account (free plan covers everything here)
- Shopify Bogus Gateway enabled
- Dedicated test customer account created
- Test product at minimal price (e.g., $0.01) for checkout runs
Test 1: Add to Cart and Proceed to Checkout
This is your most important test. It covers the most common silent failure modes: cart drawer not opening, add-to-cart not triggering, express checkout buttons missing from the product page.
Steps to record:
- Open BugBug, create a new test, click Record
- Navigate to a product page on your store
- If the consent banner appears, click Accept (BugBug records this as a step)
- Select a product variant if applicable
- Click Add to Cart
- Open the cart drawer or navigate to
/cart - Click Proceed to Checkout
- Assert that the checkout page loads with the product visible in the order summary
Where to add assertions:
- After clicking Add to Cart, assert that the cart item count is greater than 0. This catches the silent failure where the cart API completes but the item wasn't actually added — the button animates, nothing happens.
- On the checkout page, assert the product name is visible in the order summary. This catches checkout redirect failures where the page loads in a broken state.
Suggested schedule: Every 30 minutes from BugBug cloud.
Test 2: Discount Code Application
Discount logic is fragile — especially when Shopify Functions, automatic discounts, and app-based discounts interact. An update to any one of them can silently break the others.
Steps to record:
- Add a product to cart
- Proceed to checkout
- Enter a dedicated monitoring discount code
- Apply it
- Assert that the discount line appears in the order summary with the correct amount
Create a permanent test discount code. Go to Shopify Admin → Discounts and create a code with no expiry, unlimited usage, and a fixed amount off. Don't use a promotional code in your monitoring tests — they expire, hit usage limits, and your test starts failing for the wrong reason.
Test 3: Customer Registration and Confirmation Email
This is where BugBug's built-in email testing via bugbug-inbox.com makes the test possible without external tooling.
Steps to record:
- Navigate to your store's account registration page (
/account/register) - Use a bugbug-inbox.com address as the test email: e.g., shopify-test@bugbug-inbox.com
- Fill in the registration form and submit
- Add a BugBug Email step: check the bugbug-inbox.com inbox for an email from your store's domain, timeout 60 seconds
- Assert the email contains a confirmation link
What this catches: Klaviyo or Postmark configuration failures, Shopify email template errors, broken transactional flows after the new customer accounts migration.
Test 4: Password Reset Flow
Steps to record:
- Navigate to
/account/login - Click "Forgot your password?"
- Enter the test customer email
- Submit
- Assert the confirmation message appears on screen
- Add a BugBug Email step: check the inbox for the reset email within 60 seconds
- Assert the email contains a password reset link
What this catches: Reset token generation failures, email delivery failures, broken account links after Shopify's new customer accounts rollout.
Test 5: Full Checkout End to End
Your full checkout test. Run it once per hour — more frequently than that and the Flow cleanup creates noise.
Steps to record:
- Start from the homepage
- Navigate to your test product
- Add to cart
- Proceed to checkout
- Fill in shipping details — use a real address format in your primary delivery region
- Select a shipping method
- Enter Bogus Gateway card details (card number: 1)
- Place the order
- Assert the order confirmation page loads and contains "Thank you for your order"
What this catches: Payment provider script failures, shipping rate calculation errors, post-purchase app conflicts, order confirmation page rendering failures after app updates.
Automate your tests for free
Test easier than ever with BugBug test recorder. Faster than coding. Free forever.
Get started
Connecting Slack Alerts
Once your tests are scheduled, set up Slack notifications: BugBug → Settings → Integrations → Slack. Add your webhook URL and select which test suites trigger alerts. Point it at your #alerts or #qa channel.
When the checkout test fails at 2am, you see it before your first customer does.
Also read how to set up Slack notifications.
Monitoring Shopify with Playwright
Playwright is Microsoft's open-source browser automation framework. You write tests in JavaScript or TypeScript (Python and C# are also supported). It's powerful, flexible, and designed for teams with developers who can own and maintain a test codebase.
A basic Playwright checkout test for Shopify looks something like this:
test('checkout flow completes successfully', async ({ page }) => {
  await page.goto('https://yourstore.myshopify.com/products/test-product');
  await page.click('[data-testid="add-to-cart"]');
  await page.click('[data-testid="checkout-button"]');
  await page.fill('#email', 'test@example.com');
  await page.fill('#shipping-address-address1', '123 Test Street');
  // ... continue through shipping and payment
  await expect(page.locator('h1')).toContainText('Thank you for your order');
});
Where Playwright works well for Shopify monitoring:
- Cross-browser coverage. Playwright runs tests in Chromium, Firefox, and Safari (WebKit) — important if you're seeing Safari-specific cart or checkout issues.
- Mobile viewport emulation. You can run tests at 375px width and mimic a specific device user agent. Useful for testing mobile-first layouts.
- Complex conditional flows. If your Shopify store has region-based pricing, multiple payment providers, or customer-type-specific experiences, Playwright lets you write arbitrary JavaScript logic to handle branches, retries, and edge cases.
- Deep debugging. Playwright's trace viewer records a full timeline of network requests, DOM snapshots, and action logs. When a test fails in CI, you can replay the trace and see exactly what happened at the pixel level.
- Headless CI execution. Playwright integrates natively with GitHub Actions, CircleCI, and most CI platforms. If you're already running a CI pipeline, adding Playwright tests is straightforward for a developer-led team.
Honest limitations for Shopify teams:
- Requires JavaScript or TypeScript. Someone on your team needs to write, maintain, and debug the test code. When Shopify updates its checkout DOM (which happens), those selectors break — and a developer needs to fix them. For small teams without dedicated QA or engineering bandwidth, this is often the point where test automation quietly dies.
- Infrastructure to manage. Running Playwright in CI requires setup: a Docker container or GitHub Actions runner configured correctly, environment variables for credentials, browser binaries installed. This isn't heavy, but it's not zero.
- No built-in scheduler. Playwright runs tests when you trigger them (on a commit, on a schedule via CI cron). Setting up continuous hourly monitoring requires configuring a CI cron job or a separate monitoring service. It works — but it's another thing to maintain.
- Steeper learning curve. A QA engineer or non-developer setting up Playwright from scratch is looking at a significant ramp-up. The framework is well-documented, but it's designed for engineers.
Troubleshooting Common Shopify Test Failures
Test passes locally, fails in cloud. Check the failure screenshot in BugBug. If you see a Cloudflare challenge page or near-empty storefront, it's IP-based bot protection. Reduce run frequency, or keep that test on local-only scheduling.
Add-to-cart step passes but cart count stays at 0. The cart API call is being blocked or the step isn't completing correctly. Try with a bare test product with no app logic attached. If you see a 429 response in the failure screenshot, that confirms the cart API is being rate-limited at the network level — this is the scenario where reducing cloud run frequency or switching to local runs resolves it.
Consent banner click fails intermittently. The banner renders at slightly different times depending on script load order. Add a "Wait for element" step before the banner click: wait for the close button to be visible before clicking. Learn more about waiting conditions.
Checkout fails at the shipping step with "No shipping rates available." Your test address isn't valid for your configured shipping zones. For UK stores: use a full postcode from within your delivery region. For US stores: a real city/state/ZIP combination that matches your carrier settings.
Discount code shows "not valid." Verify the code in Shopify Admin → Discounts. Check it hasn't hit a usage limit or expired. If you used a promotional code in the test — replace it with a permanent monitoring-only code.
Order confirmation page doesn't render after checkout. A post-purchase upsell app is conflicting with the confirmation page. Disable your post-purchase apps temporarily and rerun to confirm.
Know Before Your Customers Do
The five tests above cover the failures that cost you customers. Not all failures — but the ones that happen regularly, produce no visible error, and that customers don't report until they've already left.
Set them up once. Schedule them. Connect Slack alerts. Then stop manually checking your store each morning and let the automation tell you when something breaks.
If your team is on Chrome and wants monitoring running today, BugBug's free plan covers local test runs with unlimited tests — no credit card required. Cloud-scheduled runs are on paid plans.
Happy (automated) testing!